Registering a Labeler Code
-
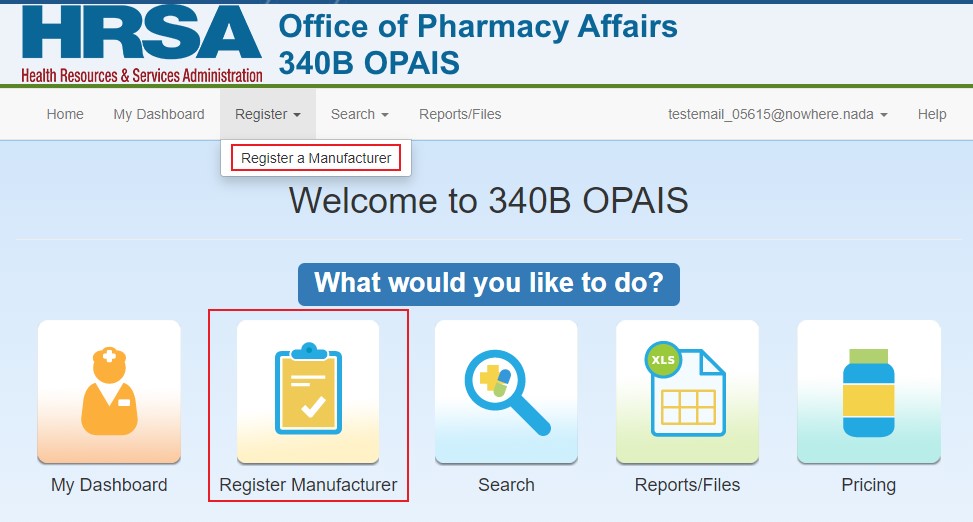
From the 340B home page, select Register > Register a Manufacturer from the top menu or click the Register Manufacturer icon.
-
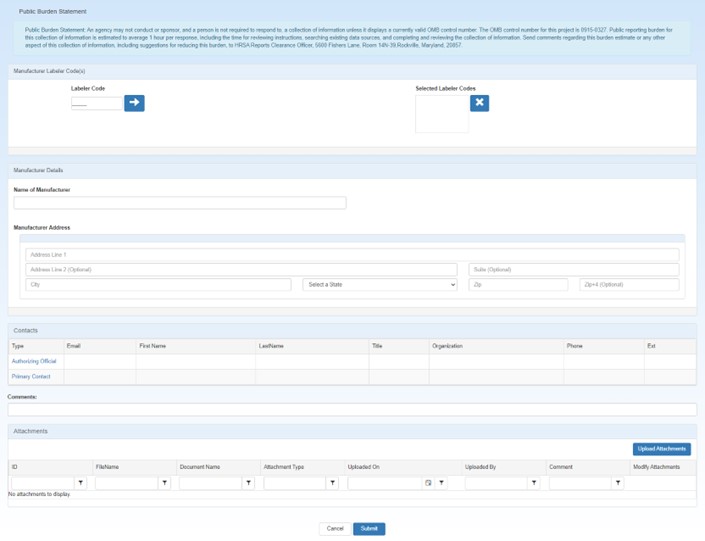
The system displays the Manufacturer Registration page for entry of labeler codes and manufacturer information.
For each labeler code you want to add, type the first five digits of the 10-digit  NDC A unique 11-digit, 3-segment code numeric identifier assigned to each medication listed under Section 510 of the US Federal Food, Drug, and Cosmetic Act. The segments identify the labeler or vendor, product (within the scope of the labeler), and trade package (of this product). The first segment (4 or 5 digits) is assigned by the Food and Drug Administration (FDA). The second segment (3 or 4 digits) identifies a specific strength, dosage form, and formulation for a particular firm. The third segment (1 or 2 digits) identifies package forms and sizes. number assigned by the FDA to identify the manufacturer and click the arrow button.
A terminated label code can be added.
-
When a terminated labeler code is entered into the Labeler Code field, the user will be asked via a popup window if they wish to continue to use the Labeler Code.

-
When the Yes button is selected the entered Labeler Code will be added to the Selected Label Codes list. When the No button is selected the entered Labeler Code will not be added to the Selected Label Codes list and the Labeler Code entry field will be cleared. In either case the pop-up window will be dismissed.
To remove a labeler code from the Selected Labeler Codes list, select it and then click the X button.
The Contact Information page specifies the AO and ![]() PC External user who is designated as a Primary Contact for an entity. This user can enter registrations and update entity information. This user can enter registrations, and update entity information. Any changes to an entity performed by the PC user must be attested to by the AO for that entity.. You may specify yourself for at least one of those roles. You may also specify another user as either AO or PC. Both contacts must be specified before proceeding.
PC External user who is designated as a Primary Contact for an entity. This user can enter registrations and update entity information. This user can enter registrations, and update entity information. Any changes to an entity performed by the PC user must be attested to by the AO for that entity.. You may specify yourself for at least one of those roles. You may also specify another user as either AO or PC. Both contacts must be specified before proceeding.
-
Click the Please Select Contact or Primary Contact link.
-
Select your own name from the drop-down list or select Enter New Contact to specify a different user.
If you select Enter New Contact, you will be prompted for the user's email address. Type the email address and click the Search button.
-
If you selected yourself or if you specified the email address for a user who has an existing
 340B OPAIS The 340B Office of Pharmacy Affairs Information System (OPAIS) is a collection of information submitted by covered entities, contract pharmacies, and manufacturers maintained and verified by HRSA's Office of Pharmacy Affairs (OPA). account, the system will display their name, title, organization, and phone number automatically.
If you specified the email address for a user who does not have a 340B OPAIS account, the system will prompt you to enter their contact information. Type their name, title, organization, and phone number in the spaces provided. The user will receive a New User Account Invitation email with instructions for creating an account.
- Click Reset to clear existing contact information if you need to make changes.
- Click Cancel to return to the labeler code registration without saving the contact information.
- Click Continue to accept the contact information.
The Telephone Extension field allows numeric values only. If a 340B OPAIS account is already associated with the email address and the extension field contains an alpha character (e.g., x305) from an existing registration, you will be prompted to correct it.
Select the Upload Attachments button to upload one or more attachments:
-
When the attachments upload selection page displays, click the Select button, navigate to the file you want to upload, and select it.
-
Follow these file attachment rules to prevent rejection during upload
Only .docs, .xlsx, .pdf, .png, .tif, .jpg, .eml, and .msg formats are allowed. Excel files must not be macro-enabled. File size is limited to 50MB.
Files must not be password protected
Files must pass virus scan.
Number of uploaded files must not exceed 10 files per submission.
-
As each file is selected, it will appear on the attachments upload selection page.
The file name of the attachment will appear in the Document Name box. It may be changed to better describe the attachment if desired.
Under Attachment Types, click the appropriate check box(es) to identify the type of attachment. You will be required to select at least 1 attachment type for each attachment.
Multiple boxes may be selected if the attachment includes multiple worksheets
Type any relevant notes in the Attachment Comments text box.
-
Repeat the steps above to select and identify additional attachments.
-
Click the Submit button to proceed when finished selecting attachments.
-
The system will display a list of the selected attachments.
| Field | Description |
|---|---|
| ID | A unique system-generated identifier associated with the attachment file. |
| Filename | Click the link to open the attachment with the application that created it (e.g., Excel). |
| Document Name | Optional user-entered description of the attachment (defaults to the file name). |
| Attachment Type | User-selected type identifier. |
| Uploaded On | Date when the attachment was uploaded. |
| Uploaded By | Email address of the user who uploaded the attachment. |
| Comment | User comment entered when the attachment was uploaded. |
| Modify Attachments |
Edit – Return to the attachments upload selection page to edit the document name, attachment type or comment. Remove – Delete the associated attachment from the entity. |
| Upload Attachments | Upload additional attachment files. |
Click on the File Name link to open and review the associated attachment.
Type any comments that will help OPA in approving the registration. This comment will be displayed in the attestation task submitted to the AO for approval.
Select the Continue button to submit the registration to the AO for attestation.
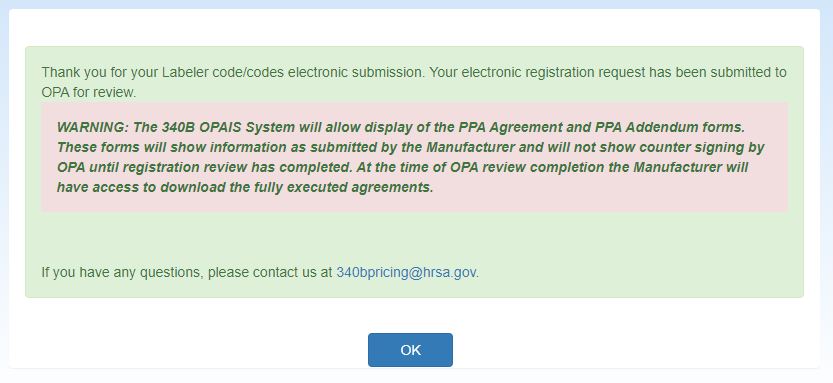
The system will display the Manufacturer Registration Submission confirmation message.
Click the OK button to return to your My Dashboard.
Upon OPA approval, the AO and the PC will both receive a Manufacturer 340B Participation Approval email, the labeler code’s status will be updated to Approved and you will be able to view the PPA and Addendum under My Active on your My Dashboard.
-
Comments by the PC regarding the registration will be displayed in the Comments text box. The AO can review and edit the comments.
-
A draft PDF version of the Pharmaceutical Pricing Agreement (
 PPA This agreement is required for manufacturers who have executed a Medicaid rebate agreement with CMS. It is voluntary for those who do not have a current Medicaid rebate agreement. The PPA must be signed by a corporate officer of the company (e.g., president, chief executive officer, or general counsel). Signatures by vice presidents or directors of sales or marketing will not be accepted. A PPA remains in effect until terminated by either the manufacturer or the Secretary of HHS. It is not automatically terminated if a manufacturer terminates its Medicaid rebate agreement.) will be created for your review and the PPA Attestation page will be displayed.
If your browser has a PDF viewer extension installed, the PDF will be displayed in the browser. If not, a Ppa.pdf file will be shown at the bottom of the browser. Double-click on it to review it.
-
There are 3 actions that can be taken:
- Make updates to the submission by selecting the Edit button to return to the previous page and update the information
- End the submission process and return to the Home page by selecting the Cancel button
- Review the PPA and attest to its content by checking the check box and selecting the Continue button
-
Clicking on the Continue button will cause the system to create a draft PDF version of the PPA Addendum and the PPA Attestation page will be displayed.

If your browser has a PDF viewer extension installed, the PDF will be displayed in the browser. If not, a Ppaaddendum.pdf file will be shown at the bottom of the browser. Double-click on it to review it.
-
There are 3 actions that can be taken:
- Go back to the PPA page by selecting the Back button
- End the submission process and return to the Home page by selecting the Cancel button
- Review the PPA Addendum and attest to its content by checking the check box and selecting the Continue button
-
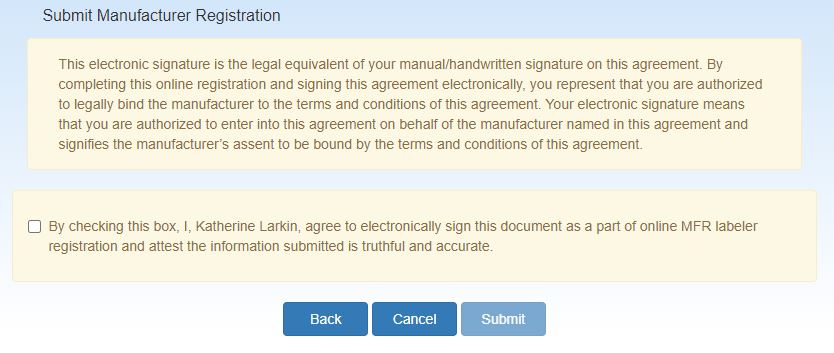
Clicking the Continue button will display the Submit Manufacturer Registration page to confirm the electronic signatures of the PPA and Addendum.
-
There are 3 actions that can be taken:
- Go back to the PPA attestation page by selecting the Back button
- End the submission process and return to the Home page by selecting the Cancel button
-
Attest to the submission by checking the check box and selecting the Submit button
-
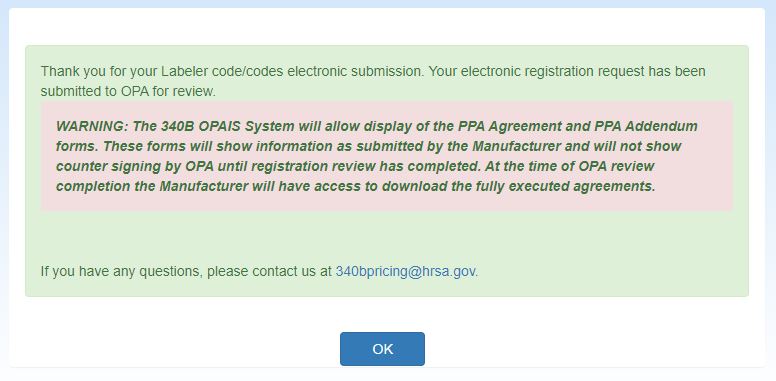
The system will display the Manufacturer Registration Submission confirmation message. Click the OK button to return to the your home page.
Upon OPA approval, the AO and the PC will both receive a Manufacturer 340B Participation Approval email and the labeler code’s manufacturer status will be updated to “Approved.”


